Table of Contents
TortoiseSVN
TortoiseSVN is a popular Apache Subversion client for Windows, implemented as a Microsoft Windows shell extension.
Getting Started with TortoiseSVN
TortoiseSVN is GNU General Public License software that you can download for free. It is available for both 32-bit and 64-bit Windows. (The CS Department only supports 64-bit Windows.)
Basic SVN Concepts
The Repository
Subversion maintains a central database which contains all your version-controlled files with their complete history. This database is referred to as the repository. The repository normally lives on a file server running the Subversion server program, which supplies content to Subversion clients (like TortoiseSVN) on request.
Working (Local) Copy
This is where you do your actual work. Every developer has his own working copy, sometimes referred to as a sandbox, on his local PC. You can pull down the latest version from the repository, work on it locally without affecting anyone else, then when you are happy with the changes you made commit them back to the repository.
A Subversion working copy does not contain the history of the project, but it does keep a copy of the files as they exist in the repository before you started making changes. This means that it is easy to check exactly what changes you have made.
Using TortuiseSVN to Access a Repository
Checking out a Working Copy
The first thing you need to do when using TortoiseSVN, is to download a local working copy of your repository. Start by creating a directory where you will keep the working copy. Right-click on the folder and the Windows Explorer context menu will appear, along with some new TortoiseSVN commands. Select SVN Checkout…'

This will open the checkout dialog:

Where you can add
- URL of Repository – The URL of the SVN repository you wish to check out.
- Checkout directory – The location on your local file system where the checkout will occur. By default, it will be the folder you right-clicked in the previous step, but you can change this manually.
- Checkout depth – This option limits what you check out. This is useful if you're changing just one subdirectory of a very large repository.
- Revision – This selects the version of the repository you want to check out. You can also select a previous revision, which is useful if you need to roll back to a version before particular changes were made. Or use the HEAD revision for the current working version.
When you've finished with the options, you're ready to finish the checkout. Click Ok.
You should then get an Authentication box where you input your login and password you use for your SVN account. Only leave the Save Authentication checkbox checked if on a private computer!

You'll now see the progress of the checkout. All files and the folders that are included in the checkout will be logged.

At the bottom of the checkout log you'll find the current checked out revision number, the time it took for the checkout to transfer the files, and the size of the data transferred.
Working with the checked out repository
Now you have a working copy on your computer; you are free to work on your own, local version of the project. When you have finished making your changes, the modified files/directories will be shown with the red exclamation mark overlay to indicate that they have been modified since they were last checked out or updated.

 Green Checkmark - File/Directory is up to date.
 Red Explanation Mark - File/Directory has been modified.
 Blue Plus Sign - File/Directory is new (Has not been added to repository).
 Yellow Diamond w/Explanation Mark - File/Directory is in a conflicted state.
Common Problems
Occasionally you may get a conflict when you update/merge your files from the repository.
There are two kinds of conflicts:
- File conflicts
- A file conflict occurs if two (or more) developers have changed the same lines of a file. This can also occur if one developer is working on code from two different computers.
- Tree conflicts
- A tree conflict occurs when a developer moved/renamed/deleted a file or folder, which another developer either also has moved/renamed/deleted or recently modified.
Just remember to always do an update before working on a file.
To address conflicts, you can either launch an external merge tool / conflict editor with TortoiseSVN –> Edit Conflicts or you can use any text editor to resolve the conflict manually. You should decide what the code should look like, do the necessary changes and save the file. Using a merge tool such as TortoiseMerge or one of the other popular tools is generally the easier option as they generally present the files involved in a 3-pane view and you don't have to worry about the conflict markers.
Committing (Saving) Your Changes with TortoiseSVN
Before you commit your changes, it is good practice to ensure your working (local) copy is up to date with the repository. To update your working copy, select the desired files or directories, right-click them and select Update from the TortoiseSVN context menu. A new screen will open displaying the update's progress. Changes performed by other team members will be merged into your files, but any changes you may have performed on the same files will be maintained.

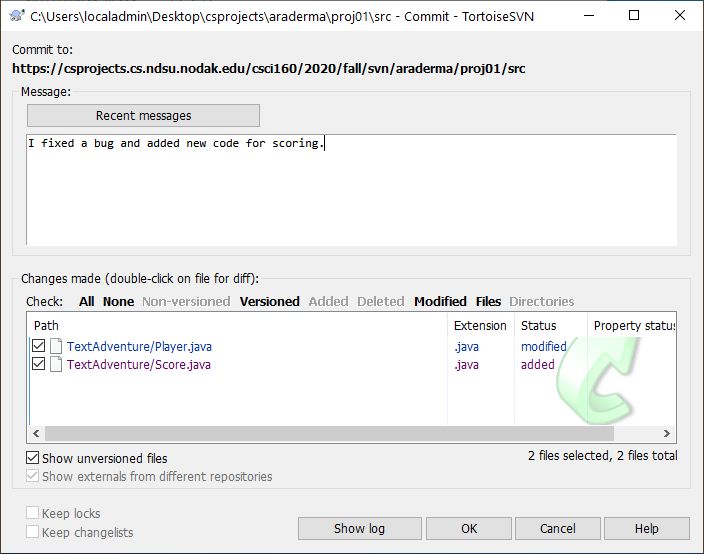
When you have ensured your working copy is up to date, it's time to add your changes to the repository. Select the desired files or directories and hit the SVN Commit… command.

SVN Commit… will open the commit dialog where you can perform a number of actions:
- Add a log message from the commit dialog. It's good practice to leave a log message as they can be useful if problems arise later.
- Prevent a particular file from being committed by unchecking the file.
- Show the log of previous actions.
- Hit OK to commit your changes to the repository.
A commit dialog box will open showing the result of the commit process.
More help can be found from TortoiseSVN support.
Loppu