Table of Contents
x2go for Windows
Download the x2go client for Windows here: https://code.x2go.org/releases/binary-win32/x2goclient/releases/4.1.2.2-2020.02.13/x2goclient-4.1.2.2-2020.02.13-setup.exe
Run the installer
To launch x2go, go to Start –> All Programs –> X2go Client for Windows –> x2go Client.
Once started, you will be greeted by this screen:
For the host field, type the ip address of the server you want to connect to. For the login field, type your CS username. Keep the SSH port at 22.
- For older Research Computers: Change the session type from KDE to 'Custom Desktop', entering in command 'startxfce4'. You can also use 'Single Application' if you only want to run a single program.
- For the QBB 244 lab, set session type to MATE
Change to the connection tab:
If you are working on campus, you can move the slider to WAN or LAN. If you are off campus, you probably want to choose ADSL. This slider changes the connection based on your connection speed. You can also change your compression settings.
The input/output tab is used for changing resolution, DPI, and keyboard settings.
If you are connecting to one of the CS Department lab or research computers, on the media tab, be sure “Enable Sound Support” and “Client side printing support” are NOT checked.
Once all the information is in, press OK. You should see your session on the right side of the window. Click it, and a box will pop up asking for your password. Type it in, and if you're asked to trust the host key, press yes. That's it! You should now be logged in to your remote host!
Troubleshooting
If x2go is not making a connection to the remote host:
- Find out if the remote computer is running x2go server. Not all computers/servers have x2go available. In the CS department, it's typically just the Linux lab.
- Try connecting via the command line using SSH to see if you can actually reach the server to which you are trying to connect.
- Be sure you have set the correct session type. Most of the CS department computers use MATE but some faculty research computers use others.
- Be sure your client version of x2go is at least 4.1.0. It if gets too far out-of-date there are handshake issues.
- Check your firewall settings. Sometimes it's set automatically by your anti-virus/malware software.
- If you have previously set up public/private key authentication, that may not work properly with x2go.
- You may need to get yourself a proxy service if connecting from outside of the USA. China, Russia, and parts of Africa and India all have had blocked connections.
- You can run x2go in debug mode to see a log file that may provide some clues as to what is wrong on your end. If you don't see debug mode, reinstall x2go.
Starting a Saved Session
In order to reconnect using a saved session, click on the connection box in the column on the right. You need to click on the box above the remote address line.
Note: Some graphical applications do not like to work via x2go. GoogleEarth for example.
X2go on Mac
Xquartz (required by X2Go Client)
The X2Go OS X client uses the OS X X11 server which can be obtained from https://www.xquartz.org/
- The X11 server must be configured to accept remote sessions in its preferences.
- One must also enable a root screen in X11 preferences if one wants truly full screen view in X2Go.
- After installation of XQuartz, the user has to log off and log on again.
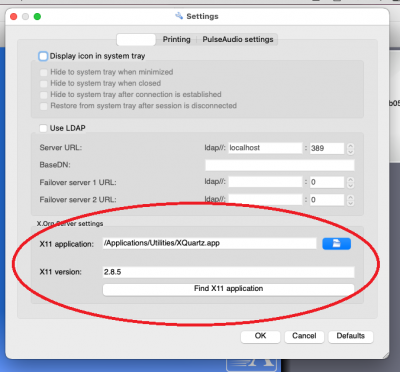
In x2go settings, be sure the X11 application path and version is correct.

To make clipboard copy and paste - +V work normally, you may need to use this command:
echo "*VT100.translations: #override Meta <KeyPress> V: insert-selection(PRIMARY, CUT_BUFFER0) \n" > ~/.Xdefaults


